When you start 3D printing it is normal to run into failures on your first parts.
Print quality depends mainly on three factors:
- Printer calibration.
- Slicer settings.
- Quality of the 3D printing filament.
Many of the most common problems in 3D printing relate to three main factors:
- Incorrect bed levelling.
- Badly adjusted printing parameters.
- Use of a low-quality 3D printing filament.
As a general rule, bear in mind that the final quality of a printed part is determined by how these elements interact:
| Factor | Influence on quality |
| Printer calibration | Determines dimensional accuracy |
| Slicer settings | Control speed, layers and flow |
| Filament quality | Affects extrusion stability |
| Printing temperature | Determines adhesion between layers |
| Cooling system | Influences the surface finish |
You need to identify where the problem comes from in order to know how to solve it. That is why, in this guide, we look at the most frequent errors that show up when printing in 3D and give you the solutions.
The most common problems in 3D printing
Spotting the most common problems in 3D printing is key to improving part quality and avoiding failures during printing.
Most errors in 3D printing relate to poor calibration, incorrect parameters or filament problems. Failures such as warping, stringing or under-extrusion can be corrected by properly adjusting the printer and the slicer.
Identifying the cause of each problem lets you optimise adhesion, accuracy and the final finish of your printed parts.
 The first layer does not stick
This is one of the most common problems in 3D printing.
When it happens, the part can shift or come away during printing. The most common causes usually relate to printer calibration, printing speed, temperature or the build platform surface.
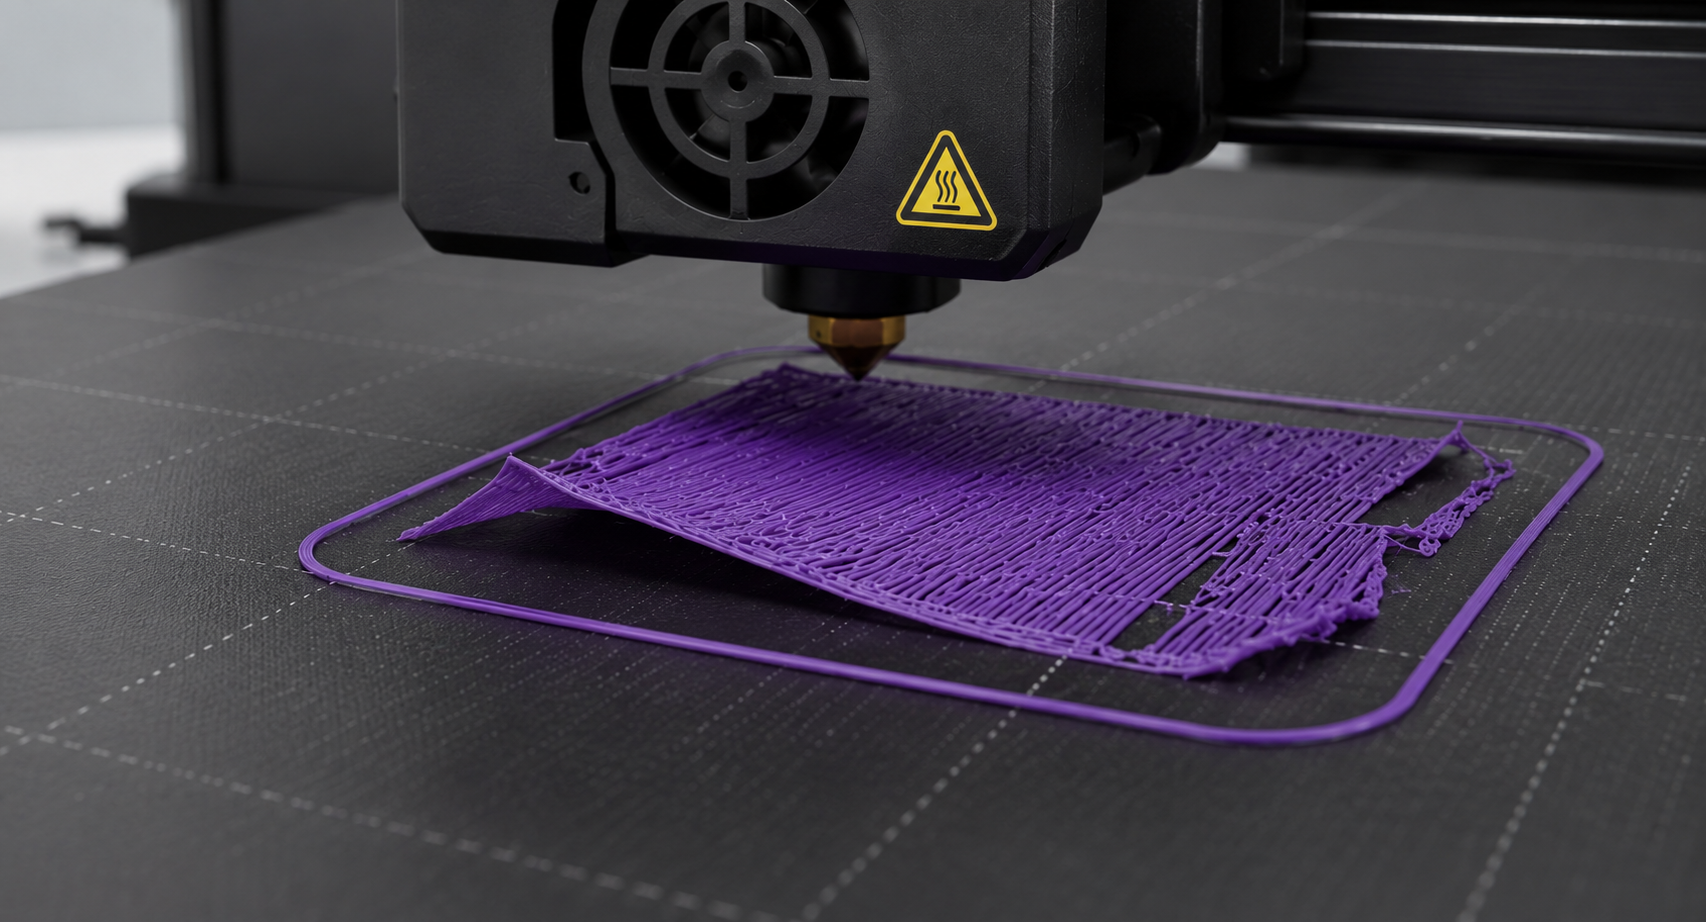
Most common causes:
- Poorly levelled bed: if the platform is not level, some areas end up too close to the nozzle and others too far, which stops the filament adhering properly.
- Nozzle too far from the bed: for the filament to adhere it must be slightly compressed against the surface. This can be adjusted with the Z-offset.
- First layer speed too high: if the first layer prints too fast, the material does not have enough time to bond to the surface.
- Incorrect temperature or cooling: if the material cools too quickly it can contract and come away from the bed.
- Unsuitable print surface: the platform material affects adhesion. It is important to keep the surface clean. Use adhesives if necessary.
- Small contact area with the bed: if the part has a very small base it can come away easily. In these cases we recommend using a raft to increase the contact area.
 Most first-layer adhesion problems are solved as follows:
- Levelling correctly at every point on the bed so the distance to the nozzle is uniform.
- Adjusting the Z-offset if the nozzle is too high and the filament is not slightly squashed onto the bed.
- Reducing the first layer speed so the material has more time to settle.
- Adjusting the bed and extrusion temperature to suit the material used.
- Turning off or reducing the fan during the first layers to avoid cooling too quickly.
- Cleaning the print surface thoroughly and, if necessary, using adhesion aids such as tape or glue.
- Enabling a brim or raft when the part has very little base to rest on.
Warping: the corners of the part lift
Warping is a common problem in 3D printing that occurs when the corners of the part start lifting off the platform during printing. This happens because the material contracts as it cools, and that contraction can overcome the adhesion to the bed.
This problem is more frequent with materials such as ABS. Controlling the printing temperature and how the material cools is the best way to avoid warping.
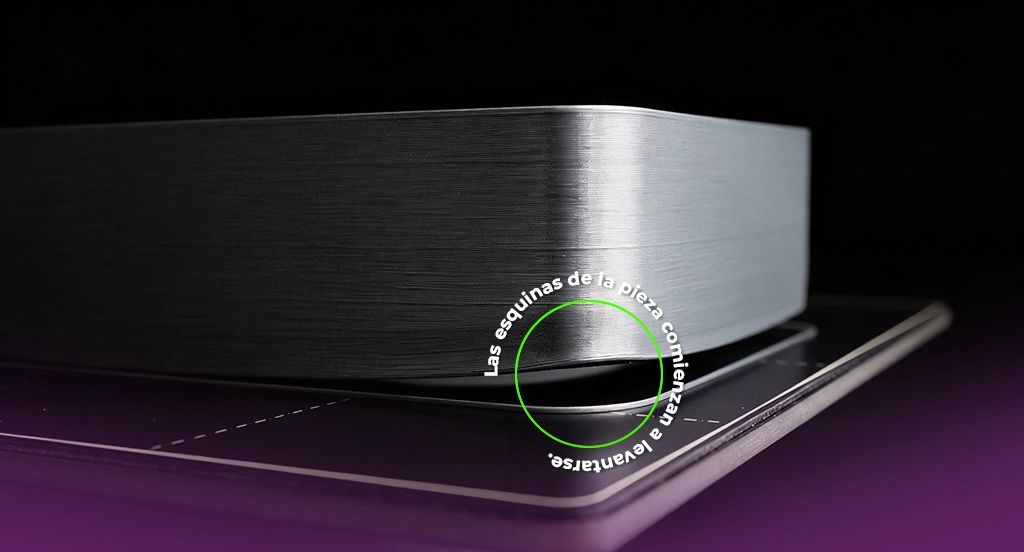
Most common causes
- Material contraction as it cools: when the material goes from extrusion temperature to room temperature, it contracts. If cooling is too fast, the corners can lift.
- Insufficient bed temperature: a bed that is too cold makes the material cool and contract too quickly.
- Draughts: cold air around the printer can cause uneven cooling across the part.
- Small contact area: parts with little base are at greater risk of deforming.
To reduce warping we recommend:
- Using a heated bed to keep the part’s temperature stable.
- Increasing the bed temperature according to the material used.
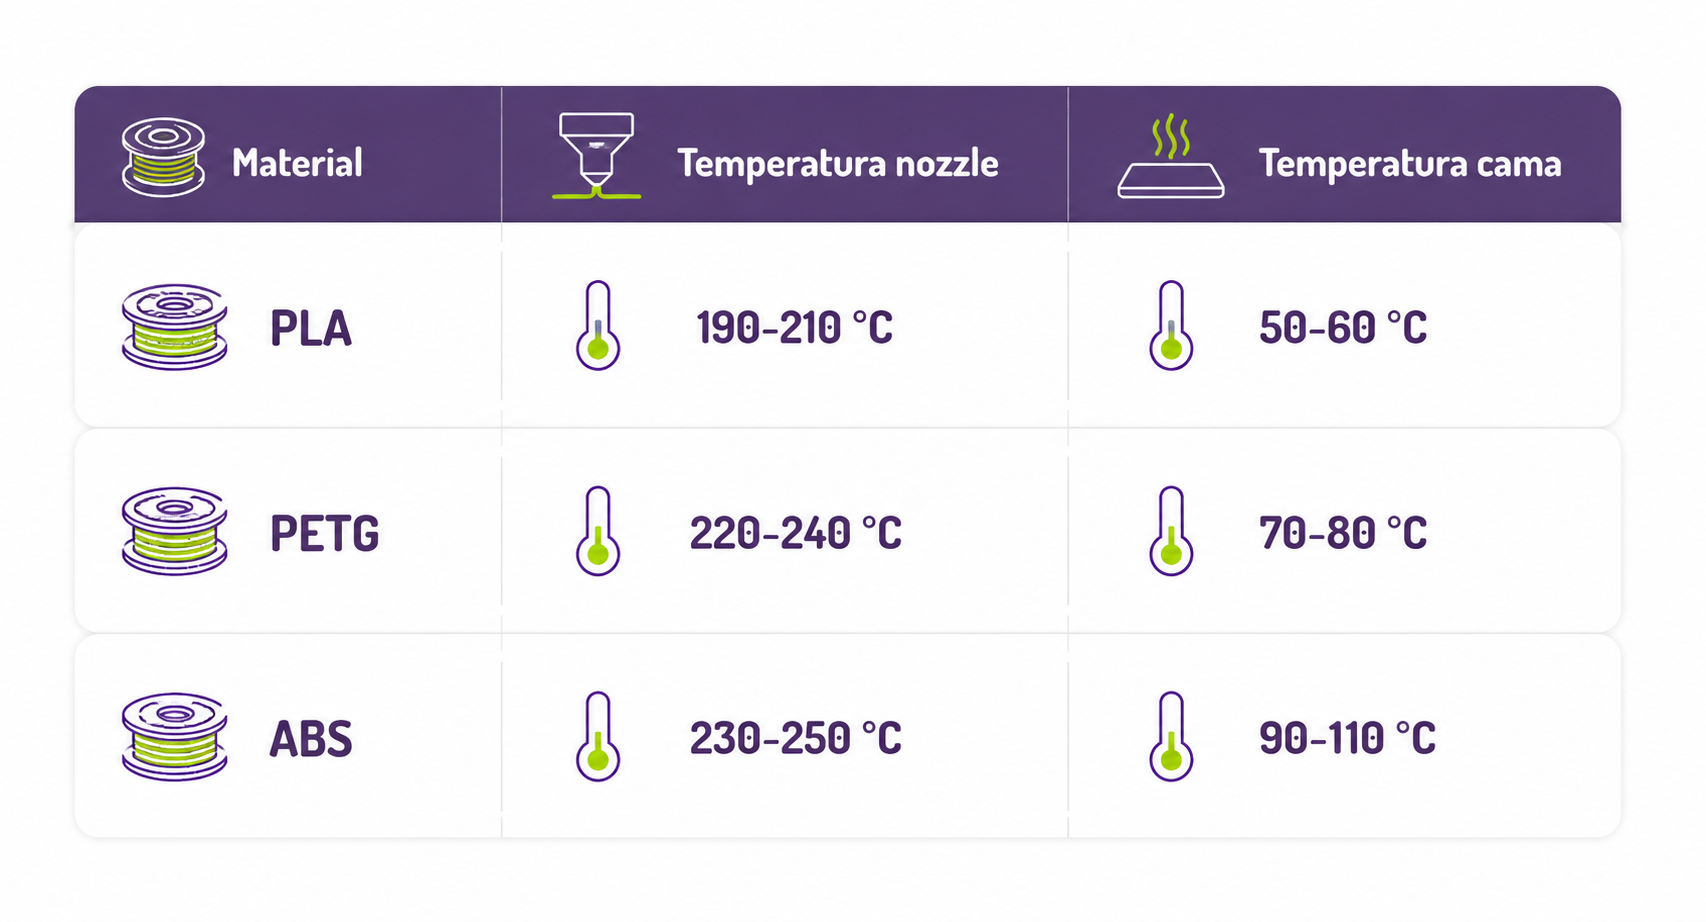
- Reducing or turning off the fan during the first layers.
- Avoiding draughts around the printer.
- Using a brim to increase the contact area with the platform.
- Printing in an enclosed printer or enclosure when using temperature-sensitive materials such as ABS.
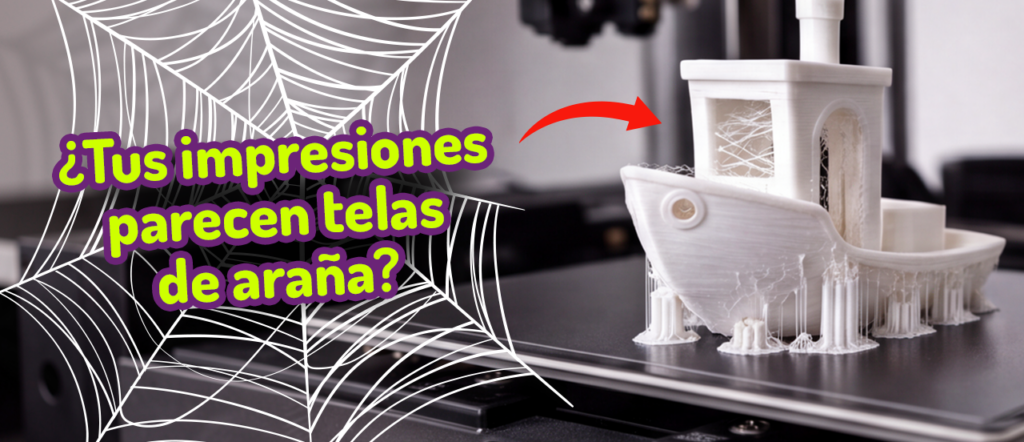
Stringing: strands appear between parts
Stringing is characterised by the appearance of fine plastic strands. This happens when material keeps coming out of the nozzle while the head travels between printing areas.
This effect tends to show up most often with PLA or PETG, especially when the temperature or retraction are not set correctly.
Most common causes:
- Printing temperature too high: if the material is too hot, it becomes more liquid and can drip during head movements.
- Incorrect retraction: retraction lets the extruder pull the filament back slightly before travel moves. If this parameter is badly set, material can keep coming out of the nozzle.
- Low travel speed: if the head moves slowly between different areas of the part, the filament has more time to form strands.
- Moisture in the filament: damp material can cause irregular extrusion and increase the appearance of strands.
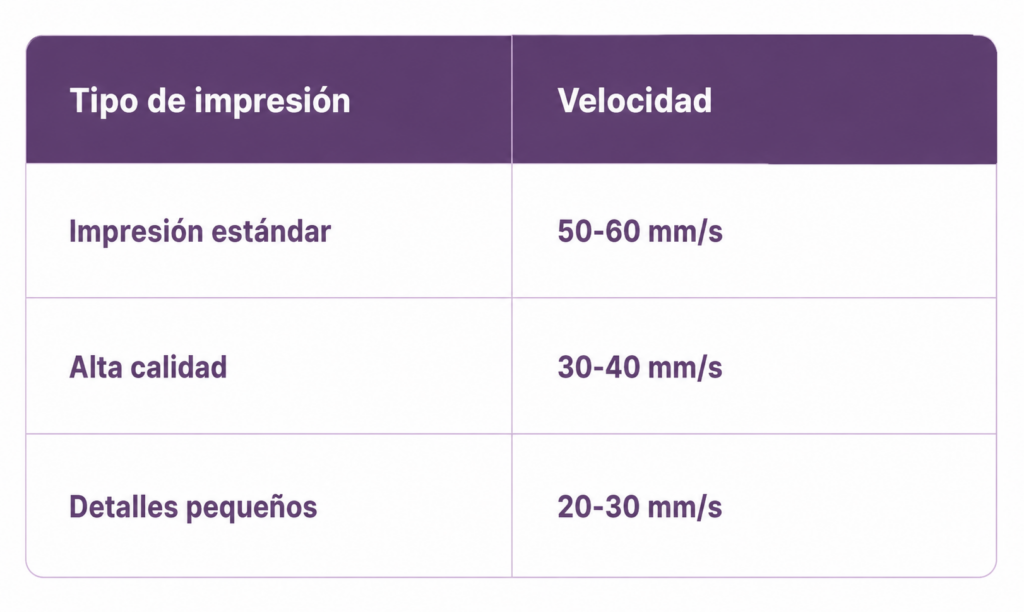
To reduce stringing we recommend:
- Lowering the printing temperature slightly.
- Adjusting the retraction settings in the slicer.
- Increasing the travel speed between non-extruding moves.
- Drying the filament if it has been exposed to moisture.
- Running retraction tests to find the optimal configuration.
Under-extrusion: not enough material in the print
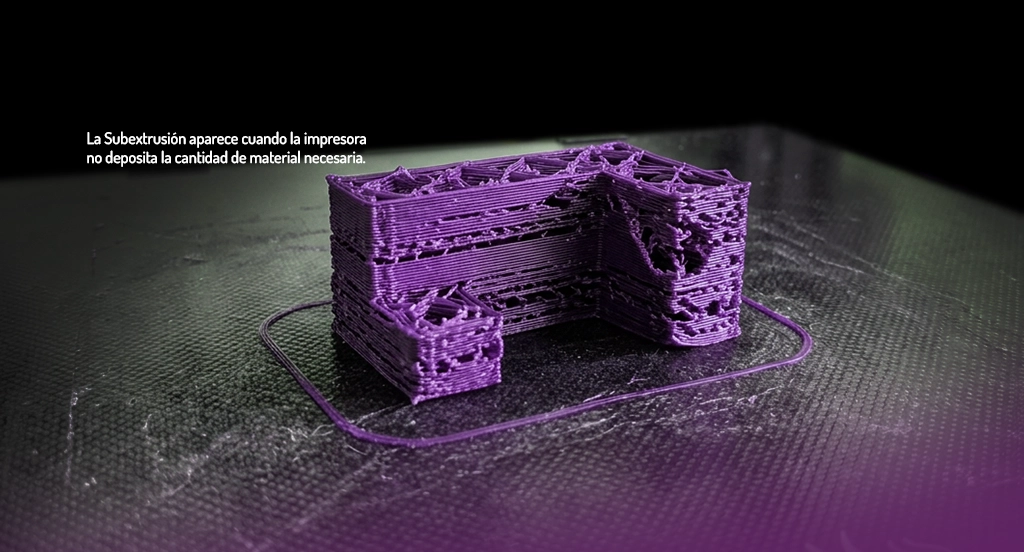
Under-extrusion appears when the printer does not lay down the required amount of material during printing. Layers may show gaps, incomplete walls or weak surfaces.
This problem usually indicates that the flow of material to the nozzle is not constant, or that the printer is not pushing enough filament during extrusion.
Most common causes:
- Partially blocked nozzle: material residue or impurities can partially block the nozzle and reduce the flow of plastic.
- Printing temperature too low: if the material does not reach the right temperature, it does not melt properly and the extruder struggles to push it.
- Problems in the extrusion system: insufficient pressure on the extruder gear or badly guided filament can stop the material advancing normally.
- Incorrect material flow setting: if the flow parameter or extrusion multiplier is set too low, the printer will lay down less material than needed.
- Filament with an irregular diameter: variations in filament diameter can cause inconsistent extrusion.
To correct under-extrusion:
- Clean or replace the nozzle if there may be a blockage.
- Raise the printing temperature slightly to improve material flow.
- Check the extruder to make sure the gear is pushing the filament correctly.
- Check the flow parameter or extrusion multiplier in the slicer.
- Check the condition of the filament and make sure it has no irregularities or moisture.
Shifted layers
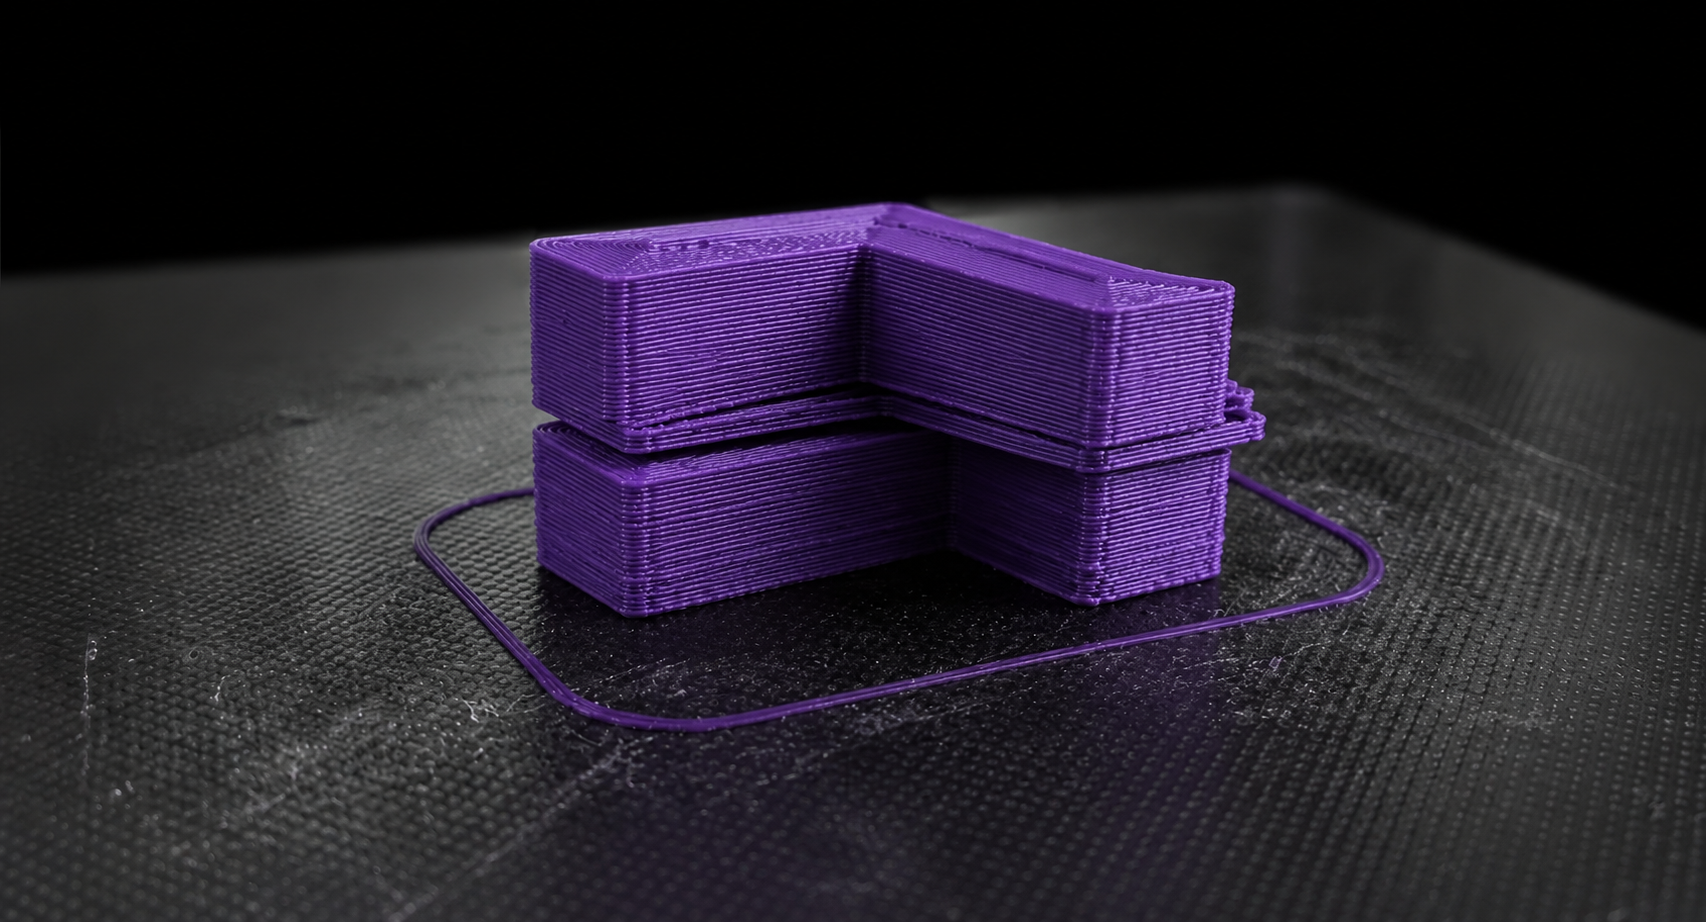
Shifted layers (layer shifting) appear when the printer loses its correct position during printing and the layers stop lining up with each other. The part takes on a stepped look.
This problem usually occurs when the X or Y axis motors lose steps, or when the mechanical system does not transmit the movement correctly.
Most common causes:
- Loose or badly tensioned belts: if the belts are too loose they can slip over the pulleys and cause layer shifts.
- Loose pulleys or screws: when the pulleys connecting the motor to the belts are not properly secured.
- Printing speed too high: when the printer moves too fast, the stepper motors can lose steps and the head may not reach the correct position.
- Nozzle collision with the part: if the nozzle strikes the part during printing, it can shift the axis and the printer loses its programmed position.
- Resistance in the axes or guides: dirt, lack of lubrication or misaligned parts can create friction in the axes, making it harder for the head or the bed to move.
How do you fix shifted layers?
- Set the belt tension correctly: the belts should be firm but not excessively tight.
- Make sure the pulleys are properly secured to the motor shaft.
- Reduce the printing speed.
- If the nozzle strikes the part, adjust the Z offset.
- Clean and lubricate the motion axes.
Use high-quality filament
Filament quality has a direct impact on printing stability.
A low-quality filament can show:
- Irregular diameter.
- Moisture.
- Impurities.
- Inconsistent extrusion.
This causes defects like the ones we have seen: under-extrusion, uneven layers or a lack of accuracy.

Filaments such as Winkle PLA are designed to maintain a stable diameter and make extrusion uniform. If you want a more technical filament, we recommend PETG.